Set up a new account on the XDA Developers Forums
Sign in to the XDA Developers Forums
Add swipe gestures to any Android, no root
Make your phone easier to use with one hand, no root
The best way to access XDA on your phone
A sweet, feature-filled launcher with a beautiful UX.
XDA’s official marketplace for buying and selling tech
Premium videos
Live streaming is one of the most popular forms of entertainment on the internet, and it’s grown into a pretty massive market. Because of how popular it is, many of us (myself included) have felt the temptation to get into streaming, even if we don’t plan to do it professionally. Getting started can feel like a daunting task, but it’s not as bad as it sounds. And if you’re struggling, we’re here to show you how to stream on Twitch using your Windows PC.
There are other platforms for live streaming out there, but Twitch is by far the most popular, so that’s what we’re focusing on. In general, the same principles will apply to whatever platform you want to use, though of course there will be some differences. Let’s get into it.
Before you get started with the more technical side of things, there are some pre-requisites and recommendations you should follow. First off, you’ll need to create a Twitch account if you haven’t already. Simply go to the Twitch homepage, click Sign Up in the top right corner, and enter your details. Fair warning: Twitch is very picky with the password you choose. You’ll need to make it long and complex for it to be accepted.
While it’s not absolutely mandatory, you are going to need to have at least two displays for your setup. More advanced streamers may have even more, but two screens are pretty much the bare minimum so you can have your stream management interface on one screen and whatever you’re playing or doing on the other. Of course, if you’re just chatting and not sharing your screen, this is less of a necessity. If you’re in need of a second screen, we have a roundup of the best monitors you can buy right now, or you can buy the Samsung Odyssey G7 below, which is one of the best gaming monitors out there.
Depending on what you’re trying to do, a capture card may also come in handy. This is mostly important if you want to stream console games so you can connect your console to your PC, so if that’s not your use case, it’s less of a problem. We have a list of the best capture cards for the Xbox Series X|S, though they should also work for other consoles, too. I personally own the Razer Ripsaw HD, but the Elgato HD 60 s+ is generally considered more user-friendly. You can buy it below.
Finally, you’re going to need a decently powerful PC. Live streaming is a somewhat demanding workload, and if you’re planning to stream your PC games, you’re absolutely going to want a powerful PC. A good idea here is to check out our list of the best laptops for content creators, as they’re generally the most suited for this kind of thing.
With all that out of the way, let’s get into how you can start streaming to Twitch from your Windows PC.
For this guide, we’re going to be using the official Twitch Studio app to stream, since it’s the official Twitch app and it works the best with this service. This should be the easiest way to do it, but there are many other streaming apps like OBS Studio, Streamlabs OBS, and more, and you can use any of them.
First off, you’re going to want to open Twitch in your browser and log into your account. Once logged in, click your profile picture in the top right corner and then click Creator Dashboard. You’ll see a bunch of tips from Twitch, but more importantly, you’ll see a big download button for Twitch Studio.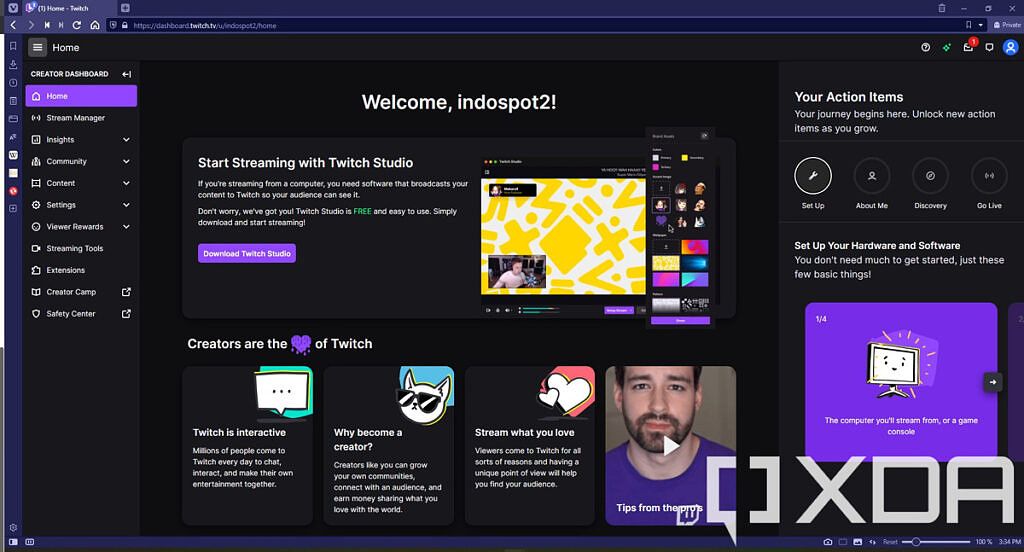
If you want to use a different streaming tool, you can also check out the Streaming Tools page on the left side menu. There are a few options available there.
Once you’ve downloaded your preferred streaming tool (again, we’re going with Twitch Studio for this guide), install it on your PC. Launch it and you’ll be taken to the first-time setup.
If you’re using the Twitch Studio app and you were logged in on your browser, your account will automatically be detected, and you can sign in that way. Otherwise, you can just login as you would normally.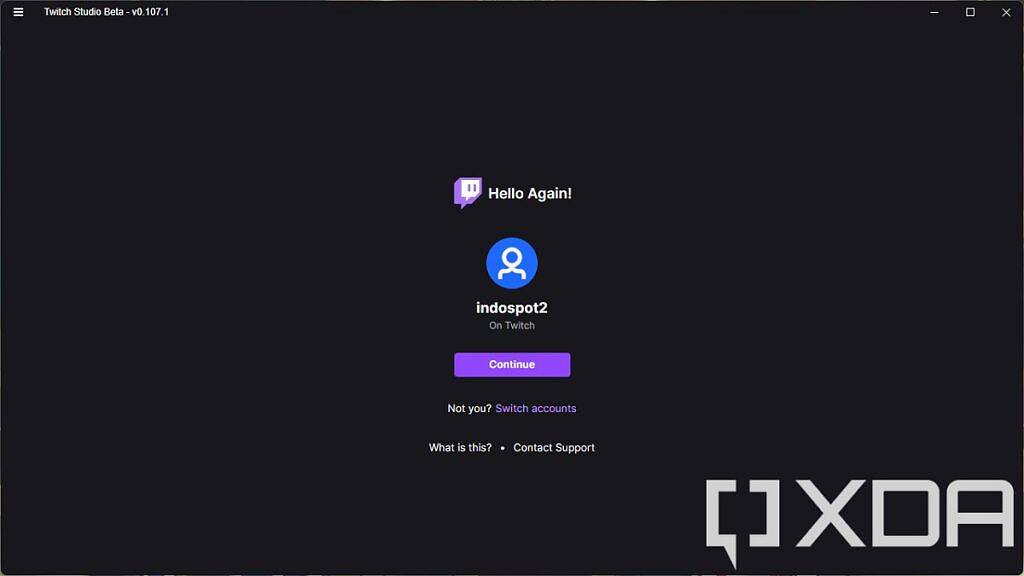
The setup process will then ask you to choose a microphone to use for streaming, you’ll be set up with three different video scenes, and a test will determine what quality you should be able to stream at. This is based on your computer’s performance and your internet speed, and as you can see below, Twitch recommends we stream at 720p resolution and 60 frames per second.
Once you’ve clicked through the setup process, you’ll arrive at your streaming studio interface. There’s quite a bit going on here, so here are the things you need to pay attention to:
That’s a fairly short explanation of everything, and with that, you’re technically ready to start streaming, but there are a few more things we should talk about.
As we mentioned above, by default, the gameplay scene is going to show you a static background, which isn’t exactly what you want for gameplay. That’s because Twitch Studio is set up to capture gameplay from a game, and if there’s no game running, that source will be empty and you’ll see your background. To see more about this, click the Edit scene button at the bottom while the gameplay scene is active.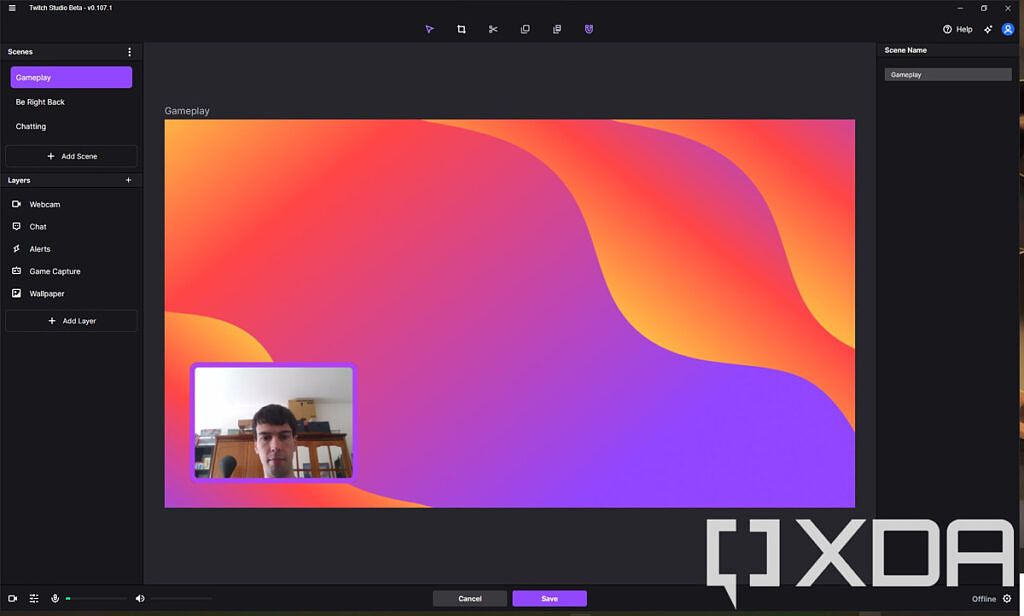
In this view, you’ll see all the video layers or sources, that are part of this scene. By default, you’ll see your webcam, chat, alerts, and something called Game Capture. The way this source works is that f you have a full-screen game running on your PC; it’s automatically detected by Twitch Studio and shown on stream. That’s why it looks static when you first launch it, but you can launch a game on your second screen to see if this is working.
But if you don’t want to stream games running on your PC, or if a game you’re running isn’t detected by Twitch, you can add a new video layer.
Click the Add layer button and you’ll see this prompt asking what kind of layer you want to add. If you want to show a game or app running on your PC, you’ll want to choose Screen share here.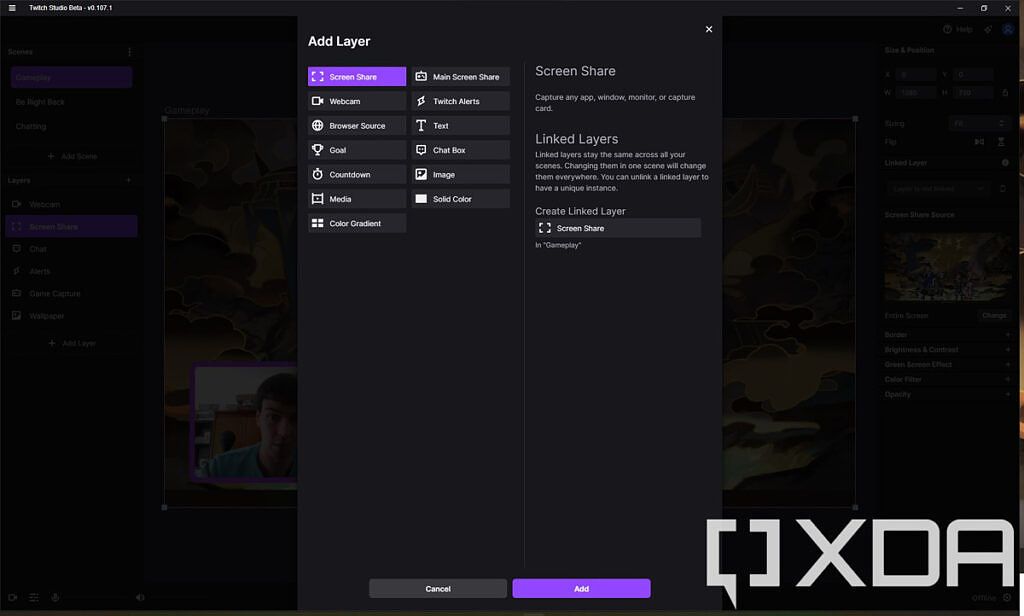
Once the source is added, you can change, you can change what kind of screen sharing you want to do. On the right side of the window, you’ll see under Screen share source that it’s set to share a full-screen application. Click the Change button and then choose a specific app window you want to stream (the app needs to be running for it to show up here), or you can choose to stream one of your displays. Here, you’ll want to choose the display where your game is running, which should be different from the one where you have Twitch Studio. If you have a capture card connected, it will also show up here.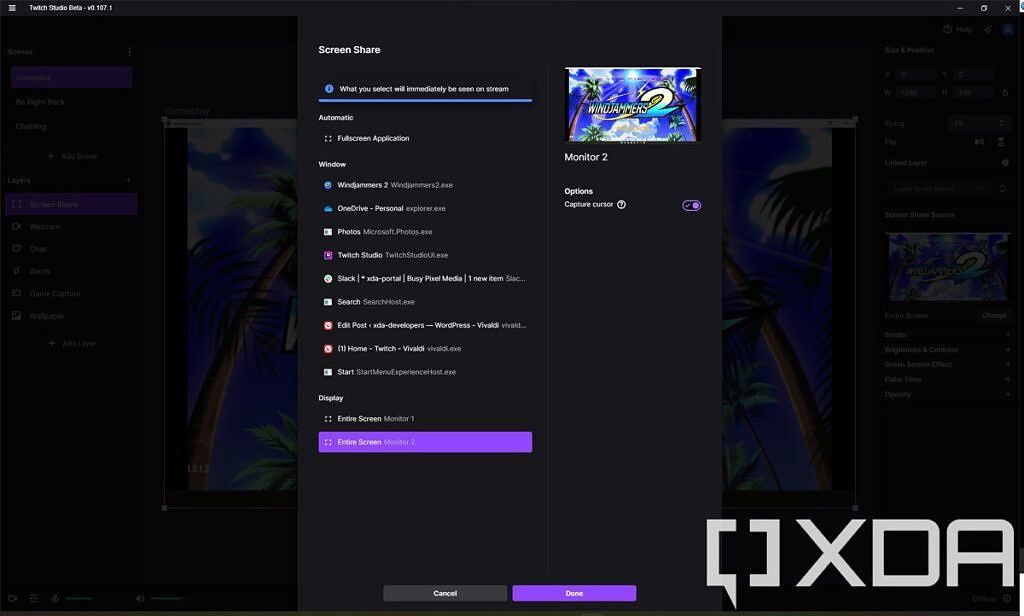
If you used your capture card and you notice that it’s not visible after you add it. If this is the case, select the layer where your capture card is and change the resolution under Size and position in the top right corner. You can just delete a number and re-enter it, and the video feed will appear as normal.
After this, you may also notice that your webcam is no longer visible. The order of your video layers is important, and since the screen share is above all your other sources, it will be the only thing visible. On the left side menu, drag your new screen share layer below your webcam and anything else you want to be visible on your stream, and you’ll see it reflected right away.
The Screen Share layer should be below the webcam layer
Note that you can also edit the existing Game Capture layer to change the source to another screen or capture card. Click the Edit button on the right side of the window and then Change to choose a new source for that layer.
After this is all done, you can save your scene and go back to the main window.
Another thing you may want to do is change the audio levels and sources on your stream. In the main view of Twitch Studio, there’s a bar with stream settings at the bottom, including some audio levels. Here’s there’s also the audio mixer button, which is the second button from the left. Click it and you’ll see the audio levels for your microphone but also other audio sources connected to your PC.
By default, all your sources will be set to the same level, but you can mute them or adjust the volume depending on your needs. You can also click Add Audio if you want a new audio source, such as sound from a specific app or input device. This also lets you apply certain effects to the audio source if needed.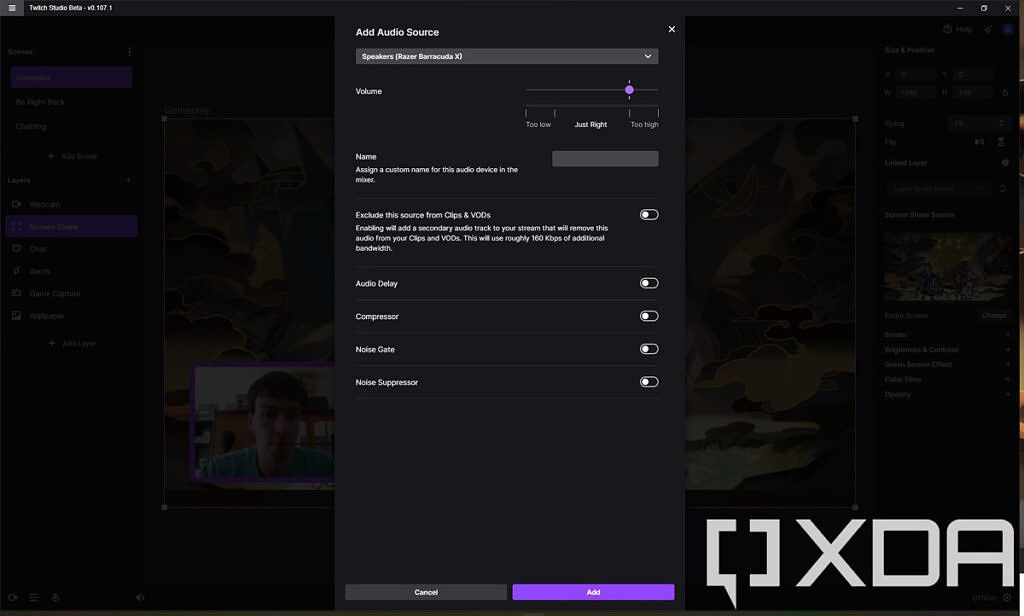
When you add an audio source, it’s added to the audio mixer on the main steaming interface so you can change the audio levels more easily.
Now that you have all your sources ready, you can start streaming. Click Start stream at the bottom of the window and you’ll be prompted to choose your stream settings. You can change the primary video source and scene before getting started, and also change your stream info and the “go live” notification.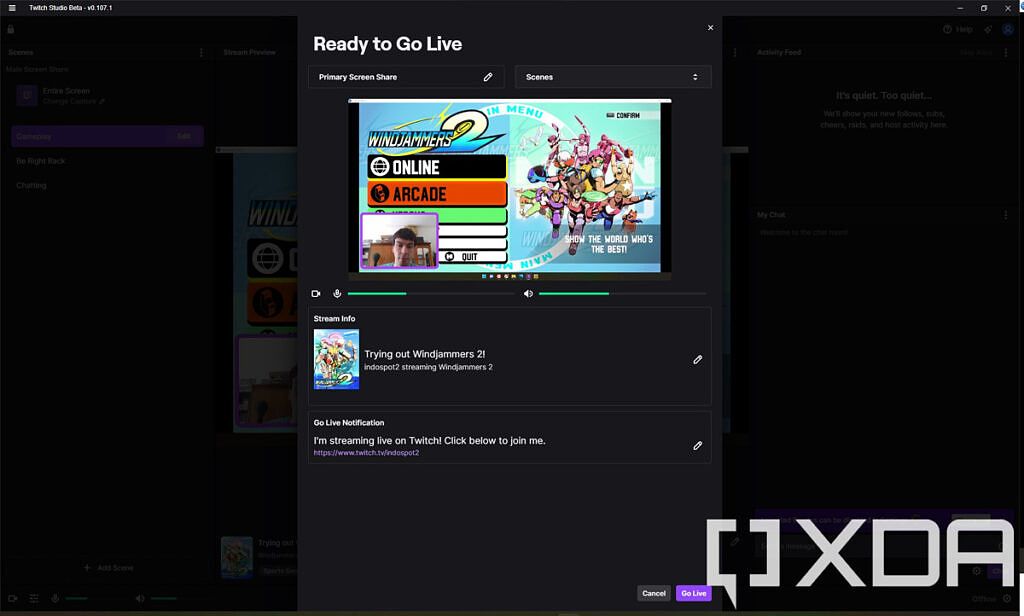
You need to enter a title for your stream and select a category. If you’re playing a game, the category should be the name of the game you’re playing so it’s easier for people to find you based on that. Certain categories also automatically add tags to your stream. Finally, you can change the language you’re streaming in so you can target the right audience.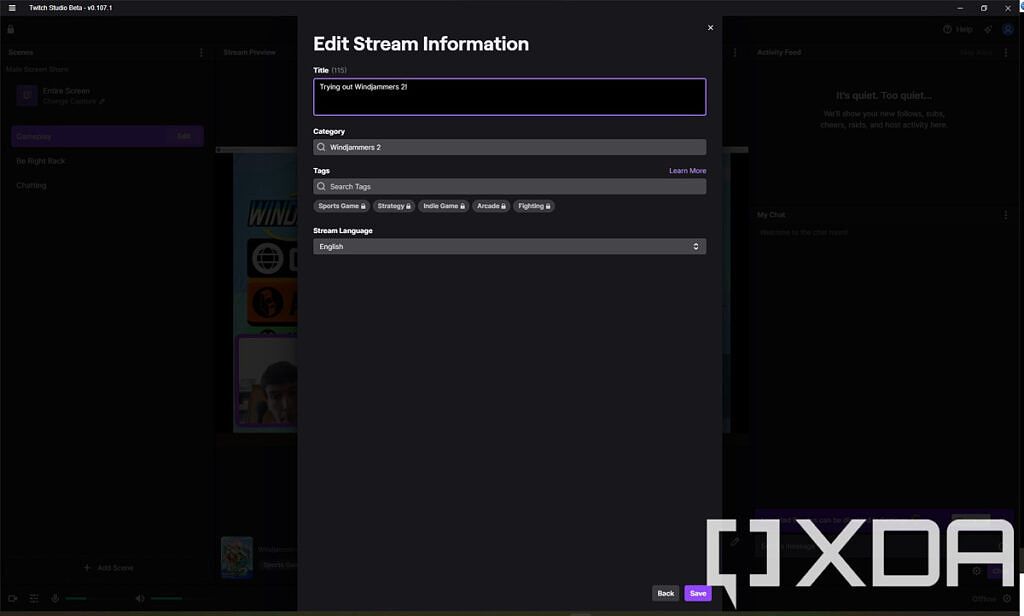
Finally, you can change the notification that’s sent to your followers when you go live. Once that’s all done, click Go Live and your stream will begin. It will be visible by going to your Twitch profile.
And that’s all you need to know to get started with streaming. We didn’t dive deep into all the available settings, but this gives you a solid idea of everything you need to know to manage your sources and scenes. As we said, there are many other streaming tools you can use, and while the UI will vary a lot, the basic concepts all apply, like adding and editing sources, changing audio levels, and so on. Twitch Studio is ideal for beginners, but other tools have more advanced options, too.
XDA » Tutorials »
Editor at XDA Computing. I've been covering the world of technology since 2018, but I've loved the field for a lot longer. And I have a weird affinity for Nintendo videogames, which I'm always happy to talk about.
Receive the freshest Android & development news right in your inbox!
XDA Developers was founded by developers, for developers. It is now a valuable resource for people who want to make the most of their mobile devices, from customizing the look and feel to adding new functionality.
Are you a developer? | Terms of Service
This site is protected by reCAPTCHA and the Google Privacy Policy and Terms of Service apply.
Copyright © XDA


 de Juego de Tronos(Game of Thrones)")