If you don’t want to install Windows 11 updates when they are released, you can decide to temporarily pause them from being downloaded and installed. Here’s how.
1. Pause Windows 11 updates in Settings
2. Delay Windows Update restart times
3. Stop Windows 11 updates using Registry Editor
4. Shutdown Windows Update via Windows services
Automatic Windows 11 updates give you the convenience of installing the latest features to keep your PC running efficiently and securely. If you don’t want to install Windows 11 updates when they are released, you can decide to temporarily pause them from being downloaded and installed on Windows 10.
The ability to pause Windows 10 updates was huge when it was released. Now Windows 11 users want to have more control on how and when updates install on their PC. Unsurprisingly, plenty of people are looking for ways to stop or block Windows 11 automatic updates completely.
If you are a veteran Windows user, you also know that updates can often try to install at inconvenient times, like when you are in the middle of a Microsoft Teams meeting. Unfortunately, you can’t stop Windows 11 updates entirely if you want to keep your PC secure and up to date.
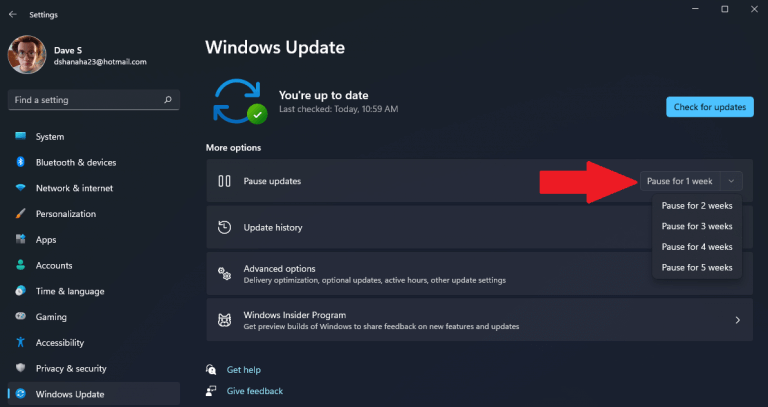
The most obvious way to pause or try to stop Windows updates is by going to Settings. Here’s what to do.
1. Windows key + I to open Settings
2. Go to Pause updates and click your preferred length option from the dropdown menu to pause Windows 11 updates. You can pause updates for up to 5 weeks.
This way you can at least pause Windows 11 updates temporarily.
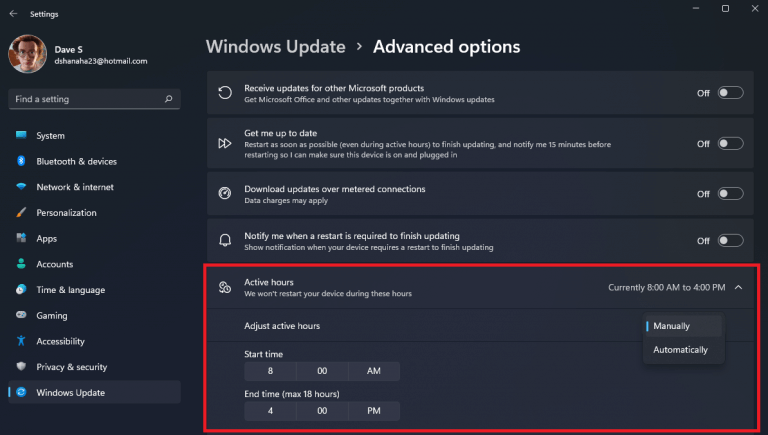
If you want to stop your PC from automatically restarting during the day to install an update, here’s what you can do.
1. Go to Advanced options
2. Go to Active hours
3. Choose to change your Active hours manually and set the time during the day that you do not want your device to restart.
Once you set your hours, close Settings when you are finished.
Now when a new Windows update is released, your PC will only restart outside your Active hours to install an update, thus avoiding an unnecessary and time-consuming interruption, depending on download and install time, to your efficiency during the workday.
Be careful while using the Registry Editor, if you change the wrong key, you can seriously mess up your PC. So it’s a probably a good idea to backup your registry so you can restore it later if needed.
If you want to block Windows 11 updates, you need to open Registry Editor, here’s what to do.
1. Windows key + R to open the Run command box
2. Type regedit and click OK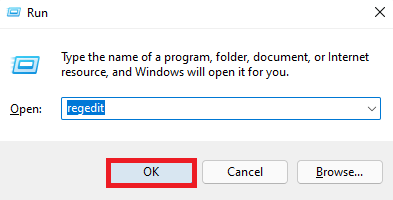
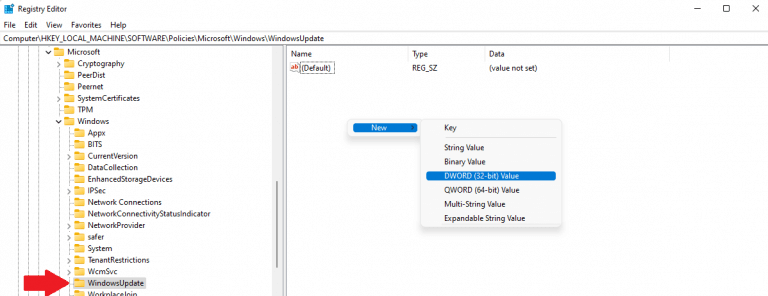
4. In Registry Editor, copy and paste or go to the following location:
HKEY_LOCAL_MACHINESOFTWAREPoliciesMicrosoftWindowsWindowsUpdate
If you can’t find the WindowsUpdate key in the Registry Editor, go to HKEY_LOCAL_MACHINESOFTWAREPoliciesMicrosoftWindows and create a new Key, and name it WindowsUpdate
5. With Windows Update in the left pane, right click the left pane and go to New > DWORD (32-bit) Value.
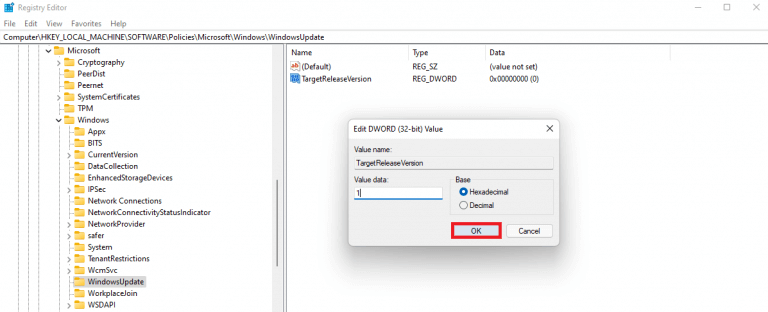
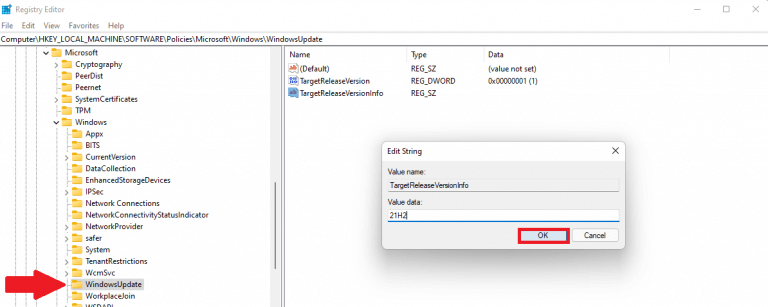
Rename the DWORD to TargetReleaseVersion and change the Value data from 0 to 1. Click OK when finished.
6. With Windows Update selected in the left pane, right click the left pane to create a New > String Value. Rename the String Value to TargetReleaseVersionInfo and change the Value Data to 21H2. Click OK when finished.
Keep in mind a future Windows Update may revert these changes in the Windows Registry, so you may need to reapply the registry edits after every new update if you want to keep using these settings.
If you want a more definite way to stop block automatic Windows 11 updates is by disabling the Windows Update service from running.
1. Open the Run dialog box with the Windows key + R Keyboard shortcut
2. Type services.msc and press OK
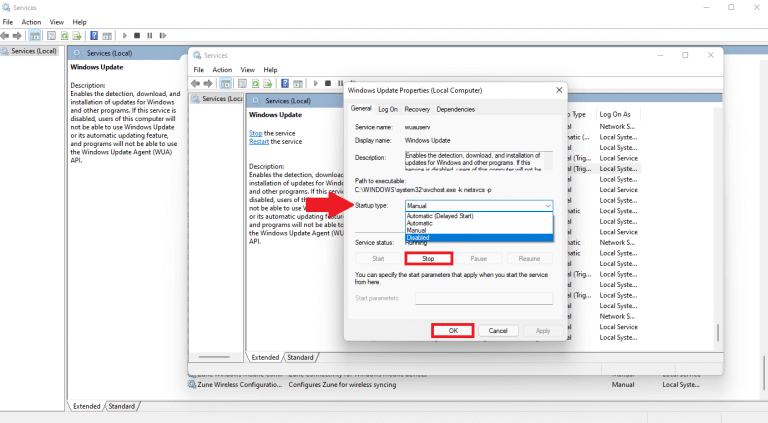
3. Scroll down the right pane of the Services window, find Windows Update and double-click it.
4. Using the Startup type dropdown menu, click Disabled. If Windows Update service is running, click Stop. Click OK to confirm the changes.
When you are finished, Windows Update will stop running, no longer check for, or install Windows 11 updates automatically. If you found this guide helpful, let us know in the comments below!
Commented on: How to enable speech recognition in Windows 10 or Windows 11
Commented on: Microsoft could face antitrust «tying» charges amid customer complaints about cloud contracts
Commented on: Everything New In Windows 11 Insider Build 22598
Commented on: OnMSFT’s second gaming give away: Win a Lenovo Legion 5i Gaming Tower w/NVIDIA GeForce GTX 1660
Commented on: How to remove System Apps in Windows 11

