Advertisement
Chrome Unboxed – The Latest Chrome OS News
A Space for All Things Chrome, Google, and More!
Twitter · Instagram · YouTube
Facebook · Email · About
Privacy Policy
By Leave a Comment

We’ve been pretty excited about the announcement of Chrome OS Flex and what it could mean for scores of aging laptops – Windows and Mac OS included. Though we have a lot of content planned around this new OS from Google, we also realize that we’ve not put up a clear guide on how to actually get this up and running on your own device. With the USB method, you can test drive Chrome OS Flex without breaking anything on your computer and make the decision if it’s the right move for you or not. So why not give it a go?
Supported Devices
We’ve talked about Google’s official list of supported, tested Chrome OS Flex devices, but it’s worth repeating. There are hundreds of laptops that have been tested with varying degrees of compatibility, but Google also recommends that you simply give Chrome OS Flex a go and see what you get. With the USB install method, there’s no risk to try Chrome OS Flex, so even if you don’t have a device on the official list, we’d recommend trying it anyway. For what it’s worth, the two devices in the video above aren’t on the list and they work great!
Get the right USB drive for the job
First things first, you’ll need to get your hands on a USB drive. We’d firmly recommend you get a USB 3.0 drive as the read/write speeds will greatly assist in running Chrome OS Flex in the smoothest way possible. We initially tried to use a USB 2.0 drive and things were painfully slow. Moving to a USB 3.0 drive, things massively improved and it became clear that if you want to test Chrome OS Flex as it would perform on your internal drive before fully installing it, you’ll need a 3.0 drive for sure.
One more thing: you’ll need to be sure your drive is at least 8GB and you’re good to proceed. It is also worth noting that Chrome OS Flex on the USB is meant for trial purposes, and it only installs the OS image and about 3.7GB of storage space. Our USB 3.0 drive is 128GB, but the Chrome OS Flex install still only sees 3.7GB of storage available. This could change down the road, but Google has told us that the point of the USB install is for trial before writing the OS to the device’s internal hard drive. Don’t expect the ability to change the partition size anytime soon.
Install the Chrome OS Flex image on the USB drive
Now that you have the hardware, let’s write a disk image! For this task, you’ll need the Chrome Recovery Utility that is installed on Chromebooks out of the box and is available everywhere else via the Chrome extension. If you like, you can use the Chrome extension on a Chromebook, too, but it is literally the exact same application either way.
Once you have the extension installed, open it up and you’ll be met with a welcome screen. If for some reason you’ve used your USB drive as a recovery drive in the past, you need to take one additional step before moving on. Click the gear up top and select ‘Erase recovery media.’ You’ll get a quick prompt to make sure you want to proceed, and after agreeing that you do, your USB drive will be ready for setup. If your drive has never been used as a recover image, you can skip this step.

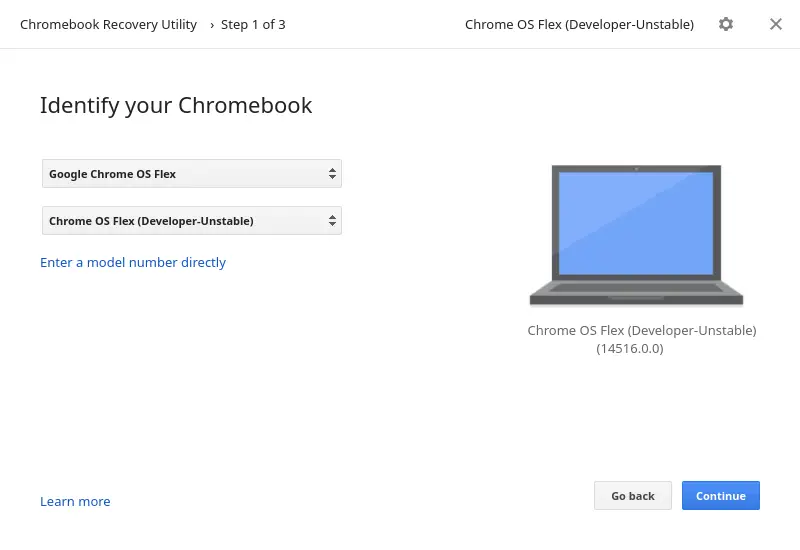
Once you have a clean drive, you can simply put it in any of your USB ports and fire up the recovery utility. Press the ‘Get started’ button, and you’ll be met with a screen where you’ll need to select the disc image you want to install. For this, you’ll click ‘Select a model from a list’ and then choose ‘Google Chrome OS Flex’ from the first drop down. The second drop down only has one option: ‘Chrome OS Flex (Developer-Unstable).
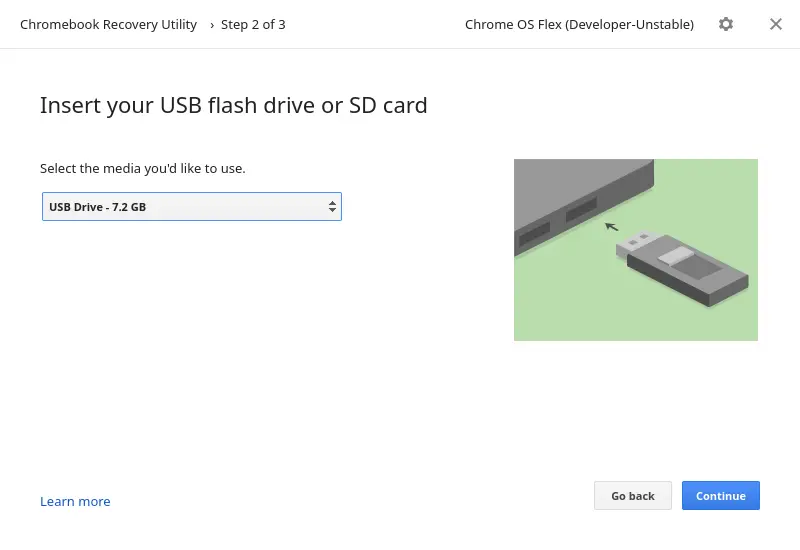
The next screen will ask you what drive you’d like to install the disk image to, and this is where you’ll select the USB drive we’ve been talking about in this whole article. If you have other drives plugged in, I’d advise you simply unplug those before proceeding just to be certain you don’t select the wrong thing. Choose your USB device and hit ‘continue’ and then ‘Create now’ on the next screen to begin the process.
Once the process is complete, you’ll be prompted that your image is complete and you can safely remove the drive. Again, this can be done via any device that runs Chrome, so you don’t have to begin this whole process with a Chromebook and you can write your Chrome OS Flex disk image with the device you plan to test it on if you so choose.
Testing out Chrome OS Flex: Boot screen
The last piece of the puzzle is finding your device’s boot screen. In general terms, the BIOS for any device controls how it boots up, and most don’t look for USB drives as default for booting up: you need to tell it to do so. So, how does that work? Well, it’s different for every laptop, but it usually consists of hitting a key or holding a button during the initial power-on phase and you’ll need to do some searching to know what that combo is.
For the MSI Windows laptop we tested, it was as simple as pressing F11 when the MSI logo appeared during boot. For the Macbook Pro, it was holding the Option key while powering on. Most devices don’t make this too difficult, but there’s no one-size-fits-all instruction, here. You’ll just need to rely on the internet to get to your boot screen, unfortunately.
Once you get there, you’ll also have to figure out how to navigate it. For the MSI, it was a simply up/down arrow to select the USB as the boot device. For the Macbook Pro, their BIOS had trackpad support, so it was even easier. Either way, you simply need to tell your machine to look for the USB first as a boot option and you’ll be good to go. After selecting it, allow a restart and you should see the familiar Chrome OS boot screen come into view.

To install or not to install?
At this point, you are able to run and use Chrome OS Flex when the USB drive is inserted. Do note that very old laptops will likely have USB 1.0 or USB 2.0 ports and regardless of your drive speed, these ports are only capable of those slower USB read/write speeds. This will likely hamper your fluidity a bit, so if you know your ports are slow and Chrome OS Flex feels slow, it may just be the ports. In this case, you really need to lean on the USB install method to simply check that things like the keyboard, mouse, trackpad and screen function properly. Once the OS is written to the internal drive, things should speed up a lot.
We’re planning a video of writing Chrome OS Flex over to the internal drive on the Macbook Pro tested in the video above and we’ll have a video up on that soon, but if you know for sure that you won’t be using the device you are testing in its current state, there’s little risk in moving forward with the full install. If you choose to do that, you can simply click the install button on the log in screen of Chrome OS Flex and it will proceed to overwrite your internal drive with the new OS. Be aware, however, that there’s no undo option with this. Once you install, you can’t go back.
We hope this guide has helped you get started with Chrome OS Flex and, again, we’ll have a full install video ready to go soon. Until then, test away and if you do a full install on a older device and choose to take the plunge, let us know. We’ll be joining you soon enough!

We’ve been pretty excited about the announcement of Chrome OS Flex and what it could mean for scores of aging laptops – Windows and Mac OS included. Though we have a lot of content planned around this new OS from Google, we also realize that we’ve not put up a clear guide on how to actually get this up and running on your own device. With the USB method, you can test drive Chrome OS Flex without breaking anything on your computer and make the decision if it’s the right move for you or not. So why not give it a go?
We’ve talked about Google’s official list of supported, tested Chrome OS Flex devices, but it’s worth repeating. There are hundreds of laptops that have been tested with varying degrees of compatibility, but Google also recommends that you simply give Chrome OS Flex a go and see what you get. With the USB install method, there’s no risk to try Chrome OS Flex, so even if you don’t have a device on the official list, we’d recommend trying it anyway. For what it’s worth, the two devices in the video above aren’t on the list and they work great!
Get the right USB drive for the job
First things first, you’ll need to get your hands on a USB drive. We’d firmly recommend you get a USB 3.0 drive as the read/write speeds will greatly assist in running Chrome OS Flex in the smoothest way possible. We initially tried to use a USB 2.0 drive and things were painfully slow. Moving to a USB 3.0 drive, things massively improved and it became clear that if you want to test Chrome OS Flex as it would perform on your internal drive before fully installing it, you’ll need a 3.0 drive for sure.
One more thing: you’ll need to be sure your drive is at least 8GB and you’re good to proceed. It is also worth noting that Chrome OS Flex on the USB is meant for trial purposes, and it only installs the OS image and about 3.7GB of storage space. Our USB 3.0 drive is 128GB, but the Chrome OS Flex install still only sees 3.7GB of storage available. This could change down the road, but Google has told us that the point of the USB install is for trial before writing the OS to the device’s internal hard drive. Don’t expect the ability to change the partition size anytime soon.
Install the Chrome OS Flex image on the USB drive
Now that you have the hardware, let’s write a disk image! For this task, you’ll need the Chrome Recovery Utility that is installed on Chromebooks out of the box and is available everywhere else via the Chrome extension. If you like, you can use the Chrome extension on a Chromebook, too, but it is literally the exact same application either way.
Once you have the extension installed, open it up and you’ll be met with a welcome screen. If for some reason you’ve used your USB drive as a recovery drive in the past, you need to take one additional step before moving on. Click the gear up top and select ‘Erase recovery media.’ You’ll get a quick prompt to make sure you want to proceed, and after agreeing that you do, your USB drive will be ready for setup. If your drive has never been used as a recover image, you can skip this step.
Once you have a clean drive, you can simply put it in any of your USB ports and fire up the recovery utility. Press the ‘Get started’ button, and you’ll be met with a screen where you’ll need to select the disc image you want to install. For this, you’ll click ‘Select a model from a list’ and then choose ‘Google Chrome OS Flex’ from the first drop down. The second drop down only has one option: ‘Chrome OS Flex (Developer-Unstable).
The next screen will ask you what drive you’d like to install the disk image to, and this is where you’ll select the USB drive we’ve been talking about in this whole article. If you have other drives plugged in, I’d advise you simply unplug those before proceeding just to be certain you don’t select the wrong thing. Choose your USB device and hit ‘continue’ and then ‘Create now’ on the next screen to begin the process.
Once the process is complete, you’ll be prompted that your image is complete and you can safely remove the drive. Again, this can be done via any device that runs Chrome, so you don’t have to begin this whole process with a Chromebook and you can write your Chrome OS Flex disk image with the device you plan to test it on if you so choose.
Testing out Chrome OS Flex: Boot screen
The last piece of the puzzle is finding your device’s boot screen. In general terms, the BIOS for any device controls how it boots up, and most don’t look for USB drives as default for booting up: you need to tell it to do so. So, how does that work? Well, it’s different for every laptop, but it usually consists of hitting a key or holding a button during the initial power-on phase and you’ll need to do some searching to know what that combo is.
For the MSI Windows laptop we tested, it was as simple as pressing F11 when the MSI logo appeared during boot. For the Macbook Pro, it was holding the Option key while powering on. Most devices don’t make this too difficult, but there’s no one-size-fits-all instruction, here. You’ll just need to rely on the internet to get to your boot screen, unfortunately.
Once you get there, you’ll also have to figure out how to navigate it. For the MSI, it was a simply up/down arrow to select the USB as the boot device. For the Macbook Pro, their BIOS had trackpad support, so it was even easier. Either way, you simply need to tell your machine to look for the USB first as a boot option and you’ll be good to go. After selecting it, allow a restart and you should see the familiar Chrome OS boot screen come into view.
To install or not to install?
At this point, you are able to run and use Chrome OS Flex when the USB drive is inserted. Do note that very old laptops will likely have USB 1.0 or USB 2.0 ports and regardless of your drive speed, these ports are only capable of those slower USB read/write speeds. This will likely hamper your fluidity a bit, so if you know your ports are slow and Chrome OS Flex feels slow, it may just be the ports. In this case, you really need to lean on the USB install method to simply check that things like the keyboard, mouse, trackpad and screen function properly. Once the OS is written to the internal drive, things should speed up a lot.
We’re planning a video of writing Chrome OS Flex over to the internal drive on the Macbook Pro tested in the video above and we’ll have a video up on that soon, but if you know for sure that you won’t be using the device you are testing in its current state, there’s little risk in moving forward with the full install. If you choose to do that, you can simply click the install button on the log in screen of Chrome OS Flex and it will proceed to overwrite your internal drive with the new OS. Be aware, however, that there’s no undo option with this. Once you install, you can’t go back.
We hope this guide has helped you get started with Chrome OS Flex and, again, we’ll have a full install video ready to go soon. Until then, test away and if you do a full install on a older device and choose to take the plunge, let us know. We’ll be joining you soon enough!
Filed Under: Chrome OS Flex, Guides and How-To’s
advertisement
TWITTER · FACEBOOK · INSTAGRAM · YOUTUBE · EMAIL · ABOUT
Copyright © 2022 · Chrome Unboxed · Chrome is a registered trademark of Google Inc.
We are participants in various affiliate advertising programs designed to provide a means for us to earn fees by linking to affiliated sites.
PRIVACY POLICY


 de Juego de Tronos(Game of Thrones)")