ASUS ROG Z11 Pre-built PC Review – Designed to be Cool
There are many PC gaming enthusiasts who enjoy the pleasures of building a new gaming rig with all the components, cabling and the works. At times, I, too, find this very appealing. Once every few months I get to enjoy a new build, even if it’s not for my own rig. However, while this may be a nice challenge for some, it’s not something that everyone would enjoy. As such, ASUS offers quite a few options for its personalised rigs, where buyers can choose their respective parts and are delivered a fully assembled PC. This forms part of the Powered by ASUS category.
Build and Design
Being a pre-built rig, there wasn’t much work for me to do to get the unit plugged in and powered on, ready to go. What I noticed right off the bat, which you wouldn’t when needing to add your own components, is the positioning of the graphics card, which you can see (top side) through the front-facing glass panel.
This front panel is split between the glass on the right-hand side and the ports on the left-hand side. There are quite a few ports to choose from, right on the front panel of the case, which we’ll touch on in more detail later on.
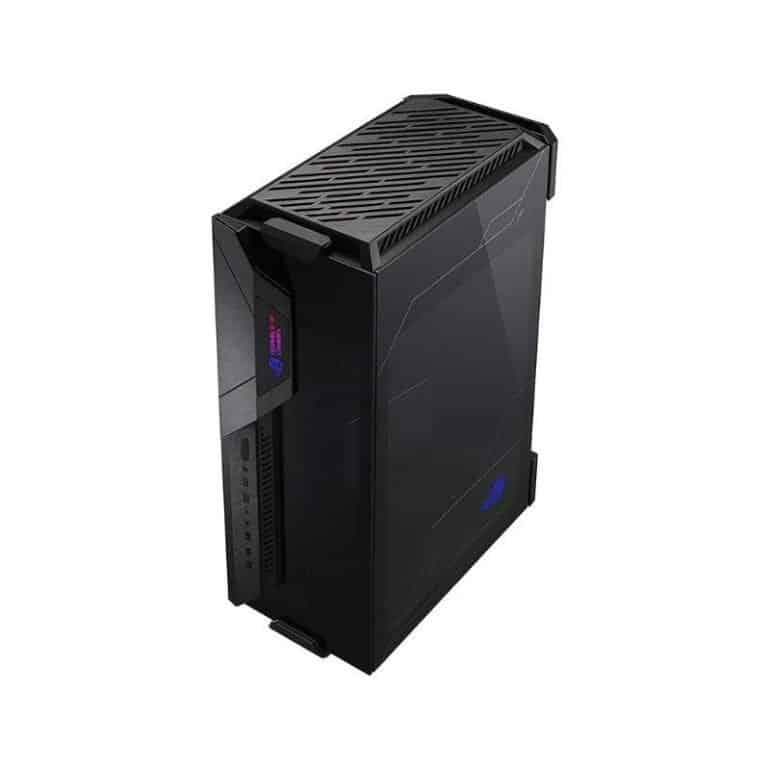
Although you may not realise it at first glance, the ASUS ROG Z11 chassis offers dual orientation. This means that the rig can be positioned upright, like the conventional gaming cases, as well as horizontally, which means that the front ports would face upward. I can’t tell which orientation I prefer, as they both have their merits.
Irrespective of which option you go with, you’ll notice plenty of grills around each of the sides. These are actually removable dust covers, that can be clipped in and out in order to wash whenever there is a bit of dust build-up. It’s both useful as well as adds a standardised look to the entire rig.
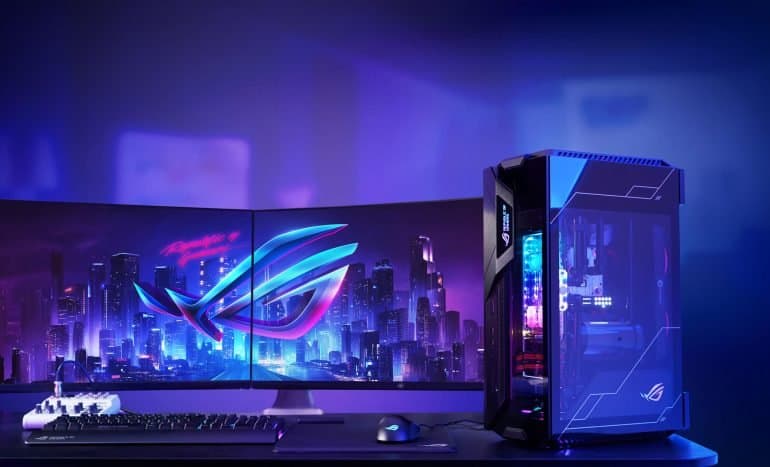
One of the cool aspects of the build is the RGB lighting. While many of the lights come from the other ASUS components, there are also a few featured lights that come with the chassis. Some of these are also interchangeable, allowing you to customise the look even further. And, of course, being an ASUS-built rig with supporting, branded components, you can easily access the RGB lighting effects to sync via the Armoury Crate software.
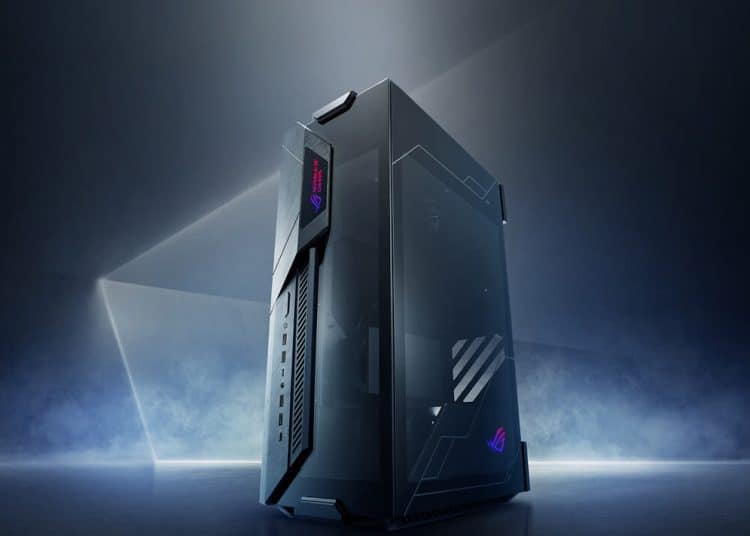
While the chassis has a fairly standard rectangular shape to it, most of the corners are angled to give it the appearance of a futuristic box, rather than a standard PC case. These angles are further emphasised on the rest of the rig which takes the form of 45° lines, which can be seen throughout. There are also plenty of visible ROG logos and text throughout the design of the ASUS ROG Z11 rig.
While the angular look creates an aggressive look about it, it achieves this while being quite subtle about it. There aren’t any over-the-top panels, vents or other additions that make it feel like it’s doing too much. It works.
ASUS ROG Z11 Case Specifications
Away from the subjective opinion of the looks and build of the case’s design, here are some specifications for the more technically inclined:
- Type Mini: Mini ITX tower
- Motherboard: Support Mini ITX
- Dimensions (HxWxD in vertical orientation): 531x194x386mm
- Material: Aluminium, Tempered Glass, ABS Plastic
- Max GPU Length: 320mm
- CPU Cooler Height: 130mm
- Weight: 8.73kg
- Internal Bays: x1 3.5”, x2 2.5” or 4x 2.5”
- Expansion Slots: x1
- Front I/O: x2 USB 3, x2 USB 2.0, x1 USB-C, 3.5mm Audio/Mic Combo
- Other: Tempered Glass Panel, RGB
- Front Fans: x2 140mm exhaust
- Rear Fans: x1 140mm intake
- Top Fans: None Included
- Bottom Fans: None Included (Up to x2 120mm)
- Power Supply: ATX or SFX 160mm
- Warranty: Two-year limited warranty
Ultimate Cooling
The ASUS ROG Z11 case was designed with cooling at the front and centre of the build. Everything within the layout of the internals, the positioning of the components and the ventilation intakes are meant to reduce the heat and enhance airflow through the case.
One of the first methods of cooling is the use of the chimney effect for the airflow within the case. This means that when the unit is positioned upright, it takes in air from the bottom, front and rear, and as it flows through the internals, it releases this air through the top vents. The notion is fairly simple, in that warm air rises easier, thus making it easier to expel upwards and out.
However, since the ASUS ROG Z11 case can also be positioned to lie horizontally, the upward-facing vents now become rear-facing vents. This, then, follows the more conventional heat expulsion, blowing out at the rear end of the case.
In addition to the well thought out ventilation system, there are also other smaller tweaks to the internal design that allows for optimised cooling. One such tweak is the title angle of the motherboard tray. While most trays are parallel to the side, the Z11 features a patented 11° angle on the tray. This provides extra room behind the motherboard of around 40mm. It essentially means that there is more room behind the CPU to dissipate the heat so it’s not focused on one area.
The CPU can then be further cooled by means of the addition of a water-cooling system. The pre-built configuration we received for review had just that. This meant that, even under the heaviest load from the CPU and/or GPU, the rig was always operating within a precise range of temperature. In fact, more often than not, it would still be cool to the touch on the external case, which meant that the air within the unit itself was still cool.

Layout and Cabling
Further to the cooling enhancements that the 11° angle provides, it also makes for better cable management. Here, there is extra room to position and tuck away all the cables running through the rig, most of which come from the PSU, along with the fans and disk drives.
To make cabling even simpler, there is a control box behind the motherboard tray. Here, you can plug in six fans scattered throughout the interior and connect a further three RGB fans. Additionally, it also supports USB 2.0 connectivity, as ARGB lighting control.
As mentioned previously, there are quite a number of ports placed on the front of the ASUS ROG Z11 rig. The reason for an increased number of ports in the front is that there are no rear-facing ports. Due to the motherboard tray positioning on the interior, it doesn’t connect to the rear of the case. Instead, there is a small slit on the rear for you to run any cables you require to connect to the motherboard. And this is probably the biggest issue I have with the design.
Instead of being able to plug in cables whenever you choose, if you cannot connect them to the front of the rig, then you’re going to need to remove the glass cover in order to feed the cables through the slot to connect. It was especially tricky to connect the HDMI and DisplayPort cables to the GPU, which is housed near the front of the case, with the ports facing upwards near the ceiling fans. It took me a while to connect the cables and have them run along next to the fans and out the rear so that they wouldn’t be caught once the fans started spinning.
Another of the tougher installs was that of the WiFi antenna. While it has a neat little housing of its own next to the motherboard to securely tuck it away, it’s the screws of the antenna that make it tough to onboard.
What makes the whole process even more inconvenient is that you’ll always need to shut down and disconnect the power in order to safely work with the internal cables that would otherwise simply be a plug-and-play option on the majority of other gaming rigs.
Pre-Built Configurations
ASUS has introduced a variety of pre-built configuration options for the ROG Z11 review unit. However, for the unit we received for review, we received the following build specifications:
- Motherboard: ROG Crosshair VIII Impact
- CPU: AMD Ryzen 9 5900X
- GPU: ROG STRIX Radeon RX 6800 OC Edition 16GB
- RAM: 16GB DDR4 Corsair Vengeance
- SSD: 2TB Kingston PCIe Gen4 m.2
- PSU: ROG Thor 850W Platinum
- CPU Cooling: TUF LC240 RGB AIO CPU Cooler
Each of the components in this specific build is great in its own respect. However, when packaged together, it makes for one crazy gaming rig. The performances are right up there with the best, resulting in quite impressive benchmark tests.
For almost all games tested, I was able to run it on 4K resolution at maximum (Ultra) graphics while still achieving the magic number of 30FPS. However, in order to make the most of the setup and achieve those 120FPS for a 120Hz monitor, you’ll need to drop some AAA games’ resolution down to 1080. Still, pretty impressive result all around.
Conclusion
Despite its flaws when it comes to the internal cabling as a result of the lack of rear port arrangement, there’s a lot to love about the design ethos of the ASUS ROG Z11. From the front-facing graphics card to the angled motherboard tray, its emphasis on looks is only outpaced by its attention to airflow within.
The ASUS ROG Z11 chassis is available at a variety of stores throughout the country, carrying an RRP of R4,799. However, the larger focus on the Powered by ASUS branding is the availability of pre-built, customised rigs that are available for the ASUS ROG brand. You can find a few of these configurations at Incredible Connection, Wootware, Computer Mania and Computers Only, amongst other retailers across SA. The customisation options are quite flexible, allowing buyers to purchase a conventional gaming rig, for something that is all-out power.
The Review
ASUS ROG Z11
When it comes to bold chassis for your gaming rig, it doesn’t always have to be this monstrosity of a gaming rig. Instead, it can still offer a bold design with good-looking aesthetics without any over-the-top elements. However, with its internal cabling layout, removing the rear-facing ports, the design is emphatically different. Despite some of the clunkiness of the ASUS ROG Z11 chassis, it still looks great, with a crazy amount of detail in the way of keeping your components cool under heavy load.
PROS
- Bold design
- Patented internals for optimised cooling
- Chimney ventilation system
- Additional front-facing ports
CONS
- Not always practical
- Can be quite heavy with all components
- Pricey

Leave a Reply
Being an avid PC gamer, there’s an intrinsic allure to the customisation of your rig. From the peripherals to the internal components, screen and more. However, one of the most prominent of these is the chassis itself. Irrespective of your budget, having a good-looking rig is all part of the fun of building your PC. I’ve completed a few chassis and pre-built reviews over the years, in that regard. However, I’ve come across quite a unique chassis and build in the form of the ASUS ROG Z11 mini-ITX tower.
There are many PC gaming enthusiasts who enjoy the pleasures of building a new gaming rig with all the components, cabling and the works. At times, I, too, find this very appealing. Once every few months I get to enjoy a new build, even if it’s not for my own rig. However, while this may be a nice challenge for some, it’s not something that everyone would enjoy. As such, ASUS offers quite a few options for its personalised rigs, where buyers can choose their respective parts and are delivered a fully assembled PC. This forms part of the Powered by ASUS category.
Being a pre-built rig, there wasn’t much work for me to do to get the unit plugged in and powered on, ready to go. What I noticed right off the bat, which you wouldn’t when needing to add your own components, is the positioning of the graphics card, which you can see (top side) through the front-facing glass panel.
This front panel is split between the glass on the right-hand side and the ports on the left-hand side. There are quite a few ports to choose from, right on the front panel of the case, which we’ll touch on in more detail later on.
Although you may not realise it at first glance, the ASUS ROG Z11 chassis offers dual orientation. This means that the rig can be positioned upright, like the conventional gaming cases, as well as horizontally, which means that the front ports would face upward. I can’t tell which orientation I prefer, as they both have their merits.
Irrespective of which option you go with, you’ll notice plenty of grills around each of the sides. These are actually removable dust covers, that can be clipped in and out in order to wash whenever there is a bit of dust build-up. It’s both useful as well as adds a standardised look to the entire rig.
One of the cool aspects of the build is the RGB lighting. While many of the lights come from the other ASUS components, there are also a few featured lights that come with the chassis. Some of these are also interchangeable, allowing you to customise the look even further. And, of course, being an ASUS-built rig with supporting, branded components, you can easily access the RGB lighting effects to sync via the Armoury Crate software.
While the chassis has a fairly standard rectangular shape to it, most of the corners are angled to give it the appearance of a futuristic box, rather than a standard PC case. These angles are further emphasised on the rest of the rig which takes the form of 45° lines, which can be seen throughout. There are also plenty of visible ROG logos and text throughout the design of the ASUS ROG Z11 rig.
While the angular look creates an aggressive look about it, it achieves this while being quite subtle about it. There aren’t any over-the-top panels, vents or other additions that make it feel like it’s doing too much. It works.
Away from the subjective opinion of the looks and build of the case’s design, here are some specifications for the more technically inclined:
The ASUS ROG Z11 case was designed with cooling at the front and centre of the build. Everything within the layout of the internals, the positioning of the components and the ventilation intakes are meant to reduce the heat and enhance airflow through the case.
One of the first methods of cooling is the use of the chimney effect for the airflow within the case. This means that when the unit is positioned upright, it takes in air from the bottom, front and rear, and as it flows through the internals, it releases this air through the top vents. The notion is fairly simple, in that warm air rises easier, thus making it easier to expel upwards and out.
However, since the ASUS ROG Z11 case can also be positioned to lie horizontally, the upward-facing vents now become rear-facing vents. This, then, follows the more conventional heat expulsion, blowing out at the rear end of the case.
In addition to the well thought out ventilation system, there are also other smaller tweaks to the internal design that allows for optimised cooling. One such tweak is the title angle of the motherboard tray. While most trays are parallel to the side, the Z11 features a patented 11° angle on the tray. This provides extra room behind the motherboard of around 40mm. It essentially means that there is more room behind the CPU to dissipate the heat so it’s not focused on one area.
The CPU can then be further cooled by means of the addition of a water-cooling system. The pre-built configuration we received for review had just that. This meant that, even under the heaviest load from the CPU and/or GPU, the rig was always operating within a precise range of temperature. In fact, more often than not, it would still be cool to the touch on the external case, which meant that the air within the unit itself was still cool.
Further to the cooling enhancements that the 11° angle provides, it also makes for better cable management. Here, there is extra room to position and tuck away all the cables running through the rig, most of which come from the PSU, along with the fans and disk drives.
To make cabling even simpler, there is a control box behind the motherboard tray. Here, you can plug in six fans scattered throughout the interior and connect a further three RGB fans. Additionally, it also supports USB 2.0 connectivity, as ARGB lighting control.
As mentioned previously, there are quite a number of ports placed on the front of the ASUS ROG Z11 rig. The reason for an increased number of ports in the front is that there are no rear-facing ports. Due to the motherboard tray positioning on the interior, it doesn’t connect to the rear of the case. Instead, there is a small slit on the rear for you to run any cables you require to connect to the motherboard. And this is probably the biggest issue I have with the design.
Instead of being able to plug in cables whenever you choose, if you cannot connect them to the front of the rig, then you’re going to need to remove the glass cover in order to feed the cables through the slot to connect. It was especially tricky to connect the HDMI and DisplayPort cables to the GPU, which is housed near the front of the case, with the ports facing upwards near the ceiling fans. It took me a while to connect the cables and have them run along next to the fans and out the rear so that they wouldn’t be caught once the fans started spinning.
Another of the tougher installs was that of the WiFi antenna. While it has a neat little housing of its own next to the motherboard to securely tuck it away, it’s the screws of the antenna that make it tough to onboard.
What makes the whole process even more inconvenient is that you’ll always need to shut down and disconnect the power in order to safely work with the internal cables that would otherwise simply be a plug-and-play option on the majority of other gaming rigs.
ASUS has introduced a variety of pre-built configuration options for the ROG Z11 review unit. However, for the unit we received for review, we received the following build specifications:
Each of the components in this specific build is great in its own respect. However, when packaged together, it makes for one crazy gaming rig. The performances are right up there with the best, resulting in quite impressive benchmark tests.
For almost all games tested, I was able to run it on 4K resolution at maximum (Ultra) graphics while still achieving the magic number of 30FPS. However, in order to make the most of the setup and achieve those 120FPS for a 120Hz monitor, you’ll need to drop some AAA games’ resolution down to 1080. Still, pretty impressive result all around.
Despite its flaws when it comes to the internal cabling as a result of the lack of rear port arrangement, there’s a lot to love about the design ethos of the ASUS ROG Z11. From the front-facing graphics card to the angled motherboard tray, its emphasis on looks is only outpaced by its attention to airflow within.
The ASUS ROG Z11 chassis is available at a variety of stores throughout the country, carrying an RRP of R4,799. However, the larger focus on the Powered by ASUS branding is the availability of pre-built, customised rigs that are available for the ASUS ROG brand. You can find a few of these configurations at Incredible Connection, Wootware, Computer Mania and Computers Only, amongst other retailers across SA. The customisation options are quite flexible, allowing buyers to purchase a conventional gaming rig, for something that is all-out power.
When it comes to bold chassis for your gaming rig, it doesn’t always have to be this monstrosity of a gaming rig. Instead, it can still offer a bold design with good-looking aesthetics without any over-the-top elements. However, with its internal cabling layout, removing the rear-facing ports, the design is emphatically different. Despite some of the clunkiness of the ASUS ROG Z11 chassis, it still looks great, with a crazy amount of detail in the way of keeping your components cool under heavy load.
Your email address will not be published.
© 2022 Fortress of Solitude, a division of Fortress Entertainment. All Rights Reserved.
© 2022 Fortress of Solitude, a division of Fortress Entertainment. All Rights Reserved.


 de Juego de Tronos(Game of Thrones)")